Hello Techies,
I was thinking of writing a post on which I spent my initial days of professional work. and it helped me to understand how the REST application works and how to setup & design it with some simple steps. So, Today we are going to learn it with this tutorial.
This tutorial will help you to understand,
- How to design & develop API with spring boot.
- How to consume it in other applications.
As usual, I’ll try to make this tutorial clearer to understand. But keep in mind that this is our first step toward learning Restful development. There are many things which will come in the future. So, stay in touch with this series tutorial.
Prerequisite:
Basic knowledge of Spring boot, Hibernate, Restful web services.
Software Used:
1. Eclipse IDE
2. MySQL Database
3. ARC Client – chrome extension
In this tutorial, we are going to build an application that will fetch the data from MySQL database using hibernate repositories, and Jersey Restful services will be used for transferring that data on UI.
I hope now it is clear that what we are planning to do in this tutorial.
Let’s Start
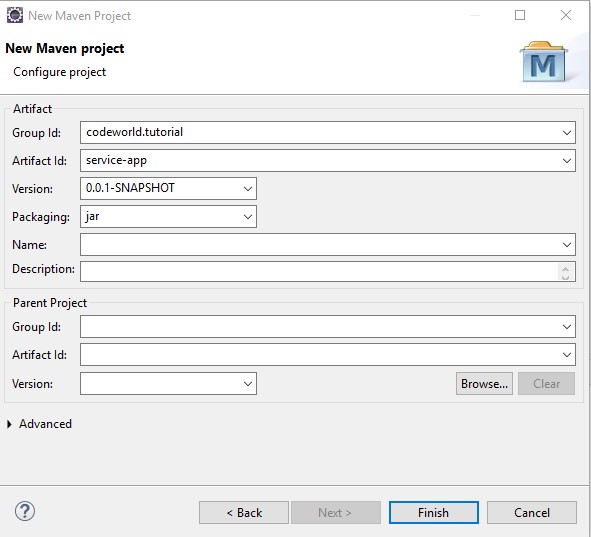
We’ll use Eclipse IDE to setup this project. and eclipse provides this option under the menu, file -> new -> maven project.
And then follow this: (check below image for more detail)
1. Select the check box to skip the archetype selection.
2. Configure the project for artifact id, group id, version, etc. and then click on finish button.
This step will create a new maven project. and you can check that project on the left side of the eclipse in the project explorer area.
But wait… Where is the spring boot project then? and where are the dependencies and all other stuff?
OK, let me clarify that we have not created a spring boot application yet. First, we’ll create some basic maven configuration and setup then, we’ll make it spring boot project. So, let’s continue.
Maven modules?
We’ll create two maven modules:
a. API module
b. Implementation module
Here, comes the designing part of our Restful application. Normally a single maven module is enough for creating a project to do our stuff. But we are developing API and other application might use this API for their use. So, we need think, what we need to expose to the other applications. If you have known the concept of abstraction then you’ll easily understand this point.
So, with this logic we are going expose what is required to other applications. In our context we are going to expose our interfaces and some Data transfer objects. Because other applications doesn’t need to know about the implementation of interfaces or the internal working of our application. And this kind of strategy is used in those application where you wanted hide your implementation from outer world.
Let’s check following diagram for more clarification:
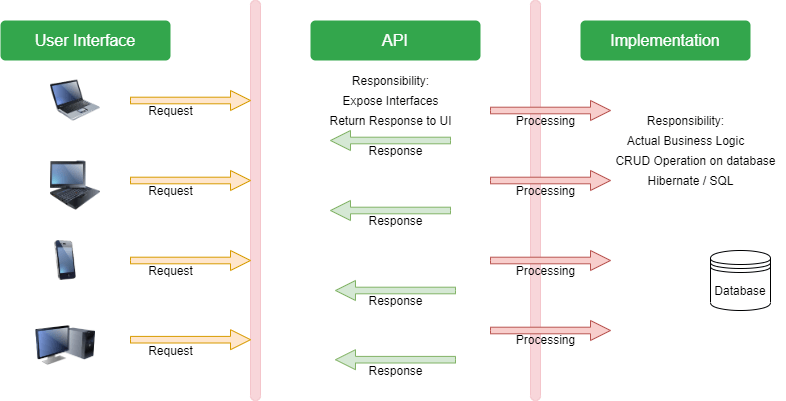
I Hope you understood why do we need two maven modules. If not then I’m sure you’ll get it when we start the actual coding. So, let’s continue.
Before, creating maven module make sure that your parent project is having packaging type as POM. Then only it is allowed to create maven module in it.
e.g. <packaging>pom</packaging>
Right click on your project and select new project. Then choose add maven module. You’ll see similar dialog which opened at the time of creating main maven project.
Then follow similar steps:
- select the check box to skip the archetype selection.
- Then configure project for artifact id, group id, version no, etc.
- check if the parent project is properly linked.
- Then click on the finish button.
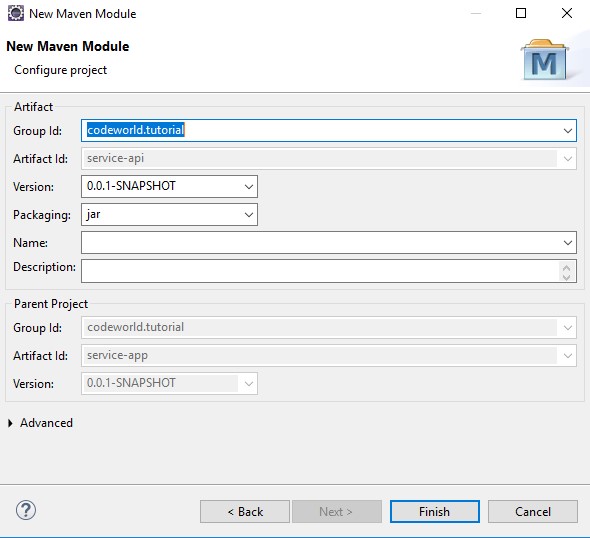
Follow the same steps of API maven module for creating the maven module for implementation.

Open parent project’s pom.xml file and insert the following code in the beginning.
<parent>
  <groupId>org.springframework.boot</groupId>
  <artifactId>spring-boot-starter-parent</artifactId>
  <version>2.1.4.RELEASE</version>
  <relativePath />
</parent>
This will add the support of spring boot to our application. and it consider spring boot is a parent project and it provides all the spring boot features to our application.
Then, parent module pom.xml looks like this:
<project xmlns="http://maven.apache.org/POM/4.0.0"
	xmlns:xsi="http://www.w3.org/2001/XMLSchema-instance"
	xsi:schemaLocation="http://maven.apache.org/POM/4.0.0 https://maven.apache.org/xsd/maven-4.0.0.xsd">
	<modelVersion>4.0.0</modelVersion>

	<parent>
		<groupId>org.springframework.boot</groupId>
		<artifactId>spring-boot-starter-parent</artifactId>
		<version>2.1.4.RELEASE</version>
		<relativePath /> <!-- lookup parent from repository -->
	</parent>

	<groupId>codeworld.tutorial</groupId>
	<artifactId>service-app</artifactId>
	<version>0.0.1-SNAPSHOT</version>
	<packaging>pom</packaging>
	<modules>
		<module>service-api</module>
		<module>service-impl</module>
	</modules>
</project> API Module dependency: To create interfaces which provides the Jersey support and interact with outer world. we need add jersey dependency in this module. let’s add it into the pom.xml
<project xmlns="http://maven.apache.org/POM/4.0.0"
	xmlns:xsi="http://www.w3.org/2001/XMLSchema-instance"
	xsi:schemaLocation="http://maven.apache.org/POM/4.0.0 https://maven.apache.org/xsd/maven-4.0.0.xsd">
	<modelVersion>4.0.0</modelVersion>
	<parent>
		<groupId>codeworld.tutorial</groupId>
		<artifactId>service-app</artifactId>
		<version>0.0.1-SNAPSHOT</version>
	</parent>
	<artifactId>service-api</artifactId>

	<dependencies>
		<dependency>
			<groupId>org.springframework.boot</groupId>
			<artifactId>spring-boot-starter-jersey</artifactId>
		</dependency>
	</dependencies>
</project>
Implementation Module Dependency:
This module is responsible for creating database connection, repositories, Entity, Jersey servlet config, Application entry point. Also, to get the access of API module’s interfaces, Dto’s, etc. in the implementation module. we need to add dependency of our API module. So, lets add dependency as per the requirements.
<project xmlns="http://maven.apache.org/POM/4.0.0"
	xmlns:xsi="http://www.w3.org/2001/XMLSchema-instance"
	xsi:schemaLocation="http://maven.apache.org/POM/4.0.0 https://maven.apache.org/xsd/maven-4.0.0.xsd">
	<modelVersion>4.0.0</modelVersion>
	<parent>
		<groupId>codeworld.tutorial</groupId>
		<artifactId>service-app</artifactId>
		<version>0.0.1-SNAPSHOT</version>
	</parent>
	<artifactId>service-impl</artifactId>

	<dependencies>
		<dependency>
			<groupId>codeworld.tutorial</groupId>
			<artifactId>service-api</artifactId>
			<version>${project.version}</version>
		</dependency>
		<dependency>
			<groupId>org.springframework.boot</groupId>
			<artifactId>spring-boot-starter-data-jpa</artifactId>
		</dependency>
		<dependency>
			<groupId>org.springframework.boot</groupId>
			<artifactId>spring-boot-starter-web</artifactId>
		</dependency>
		<dependency>
			<groupId>mysql</groupId>
			<artifactId>mysql-connector-java</artifactId>
			<scope>runtime</scope>
		</dependency>
	</dependencies>

	<build>
		<plugins>
			<plugin>
				<groupId>org.springframework.boot</groupId>
				<artifactId>spring-boot-maven-plugin</artifactId>
			</plugin>
		</plugins>
	</build>
</project>
At this step we have completed the multi module maven project setup task.
If you are facing any dependency related issue then please build your application With following command :
mvn clean install
Create a main class in the Implementation module which will be the entry point of our application.
@SpringBootApplication
public class ServiceApplication {

    public static void main(String[] args) {
        SpringApplication.run(ServiceApplication.class, args);
    }

}
Let’s Start Coding…
We have a database table “FILM” for which we are going to create a REST service, DTO, REST Service Implementation, repository, entity, etc.
a. Data transfer object (Location: API module)
public class Film {

    private Long id;
    private String title;
    private String description;
    private Date releaseDate;
    private String rating;
    private String features;

    // Constructors
    // Getters and Setters

 }
b. REST service (Location: API module)
package codeworld.tutorial.service;

import java.util.List;

import javax.ws.rs.Consumes;
import javax.ws.rs.GET;
import javax.ws.rs.Path;
import javax.ws.rs.Produces;
import javax.ws.rs.core.MediaType;

import codeworld.tutorial.dto.Film;

@Path("filmService")
@Produces(MediaType.APPLICATION_JSON)
@Consumes(MediaType.APPLICATION_JSON)
public interface FilmService {

    @GET
    @Path("/findAll")
    public List<Film> findAll();

}
c. Entity (Location: Implementation module)
package codeworld.tutorial.entity;

import java.util.Date;

import javax.persistence.Column;
import javax.persistence.Entity;
import javax.persistence.GeneratedValue;
import javax.persistence.GenerationType;
import javax.persistence.Id;
import javax.persistence.Table;

@Entity
@Table(name = "FILM")
public class FilmEntity {

    @Id
    @GeneratedValue(strategy = GenerationType.AUTO)
    @Column(name = "FILM_ID")
    private Long id;

    @Column(name = "TITLE")
    private String title;

    @Column(name = "DESCRIPTION")
    private String description;

    @Column(name = "RELEASE_YEAR")
    private Date releaseYear;

    @Column(name = "RATING")
    private String rating;

    @Column(name = "SPECIAL_FEATURES")
    private String features;

    // Constructors
    // getter and setter
}
d. Repository (Location: Implementation module)
package codeworld.tutorial.repository;

import org.springframework.data.repository.CrudRepository;
import org.springframework.stereotype.Repository;

import codeworld.tutorial.entity.FilmEntity;

@Repository
public interface FilmRepository extends CrudRepository<FilmEntity, Long> {

}
e. Service Implementation (Location: Implementation module)
package codeworld.tutorial.impl;

import java.util.List;
import java.util.stream.Collectors;
import javax.annotation.Resource;
import org.springframework.stereotype.Service;
import org.springframework.transaction.annotation.Transactional;
import codeworld.tutorial.dto.Film;
import codeworld.tutorial.entity.FilmEntity;
import codeworld.tutorial.repository.FilmRepository;
import codeworld.tutorial.service.FilmService;

@Service
@Transactional
public class FilmServiceImpl implements FilmService {

    @Resource
    private FilmRepository filmRepository;

    @Override
    public List<Film> findAll() {
        List<FilmEntity> entities = (List<FilmEntity>) filmRepository.findAll();
        return entities.stream()
                .map(this::converToDto)
                .collect(Collectors.toList());
    }

    private Film converToDto(FilmEntity entity) {
        Film film = new Film();
        film.setId(entity.getId());
        film.setDescription(entity.getDescription());
        film.setFeatures(entity.getFeatures());
        film.setRating(entity.getRating());
        film.setTitle(entity.getTitle());
        film.setReleaseDate(entity.getReleaseYear());
        return film;
    }
}
To handle some task like component scan, database connectivity we’ll create a configuration file in the implementation module with some spring annotation.
@Configuration
@ComponentScan(basePackages = "codeworld.tutorial.*")
@EnableAutoConfiguration
public class AppConfiguration {

}
@EnableAutoConfiguration:
This annotation provides the automated way for creating database connection. So, it will remove the headache of writing code for it. this annotation tells spring to read the database URL, username, password and other information from application.properties file and create the database connection for us.
Create application.properties file in the resources package with following values
## Spring DATASOURCE (DataSourceAutoConfiguration & DataSourceProperties)
spring.datasource.url =jdbc:mysql://localhost:3306/codeworld
spring.datasource.username =root
spring.datasource.password =root

spring.datasource.driver-class-name=com.mysql.cj.jdbc.Driver

## Hibernate Properties
# The SQL dialect makes Hibernate generate better SQL for the chosen database
spring.jpa.properties.hibernate.dialect =org.hibernate.dialect.MySQL5Dialect

# Hibernate ddl auto (create, create-drop, validate, update)
spring.jpa.hibernate.ddl-auto =update
spring.show.sql=true
Jersey required all the services to register with it. it provides the different way to do this. but, we’ll use java based configuration to register our services. Here, I’m adding some extra code for making it more flexible. it scan all the services with @Service annotation and register it. but you can directly register your service with the exact name also. but then you need to take care of the newly created services.
package codeworld.tutorial.configuration;

import java.util.Map;

import javax.annotation.PostConstruct;
import javax.annotation.Resource;

import org.glassfish.jersey.server.ResourceConfig;
import org.springframework.context.ApplicationContext;
import org.springframework.context.annotation.Configuration;
import org.springframework.stereotype.Service;

@Configuration
public class JerseyServlet extends ResourceConfig {

    @Resource
    private ApplicationContext context;

    @PostConstruct
    public void postConstruct() {
        for (final Map.Entry<String, Object> entry : context.getBeansWithAnnotation(Service.class)
                .entrySet()) {
            register(entry.getValue());
        }
    }
}
We are almost done with our coding part. So, Let’s Run the application and test it. To start the service application you need to run the “ServiceApplication.java” from the Implementation module.
To Check the result you can use your browser or ARC client or POSTMAN.
Let’s check this URL: http://localhost:8080/filmService/findAll
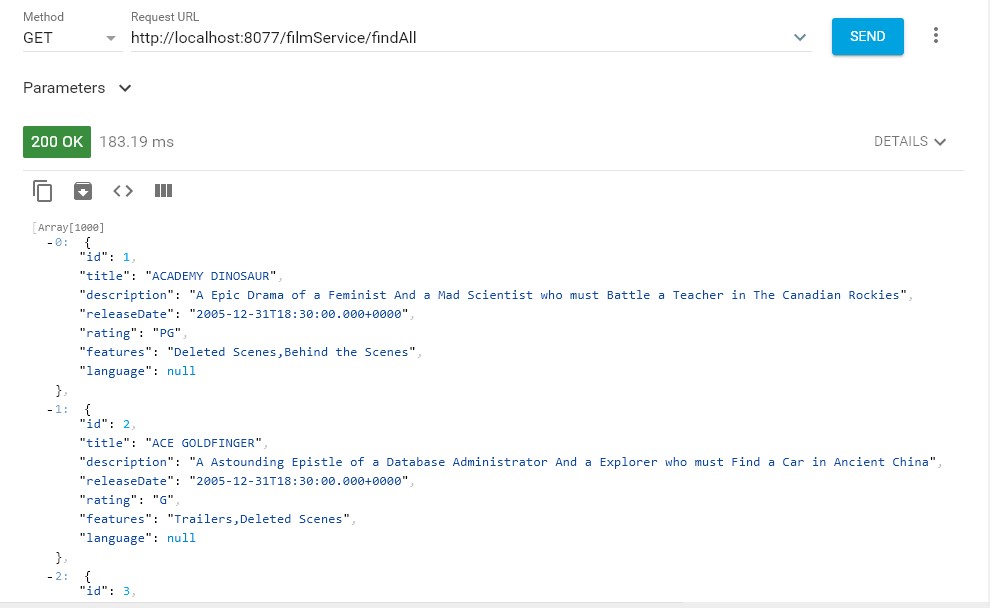
Hurray, Our service is successfully started and we got the records.
Summary:
We have learned creating multi module maven project with spring boot. and understood the required dependencies. Also, we have covered Jersey based REST application configuration and some basics of spring boot configurations.
Future scope:
In the next series of this tutorial we are going to consume this service with other UI Application and display the data on screen with some UI components. It help us learn about how to create Jersey client and consume REST services.
The source code can be found here:
https://github.com/mecodeworld/Jersey-tutorial.git
