Hello Techies,
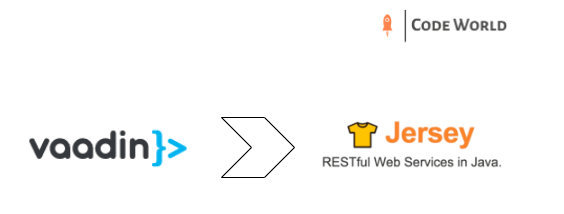
Welcome to this tutorial. Today, we are going to learn about consuming REST services in the UI Application. This tutorial will help you to understand how to create a client connection to consume any REST API. And display that data on the screen with the help of some UI components. So, we are going to separate our application in two different part:
- SERVICE Layer
- UI Layer
Many companies are still following this kind of architecture to separate the UI and service layer in their development. This structure is very helpful in case of application maintenance. Because different teams can simultaneously work on these two different parts of the application. It also helps the developer to be more focused on their tasks. And the team can handle the development, testing deployment, etc. separately without any tight dependencies.
Audience:
This tutorial is focused on fresher as well as professional developers. Especially those who are interested in the Vaadin framework.
Prerequisite:
Basic knowledge of Vaadin framework is a must.
You should have basic understanding of Restful services, Hibernate, spring framework.
The software’s used:
1. Eclipse IDE (install Vaadin plugin – Optional)
2. MySQL Database
3. Node js And NPM
What you’ll learn from this tutorial?
- Creation of Restful Services.
- Creating a Vaadin Project (Basic setup + configuration).
- Creating the REST client.
- Consume REST endpoints in the code (without using 3rd party application Like POSTMAN, ARC Client, etc.)
- Display the data on Vaadin components.
Let’s start…
1.Restful service
If you have gone through my blog then you’ll notice that I’ve already published my post on how to create Restful services-based application. So, we are going to refer that to save time. Please check it here
2. Creating a Vaadin project (Basic setup + configuration)
If you are familiar with the spring boot starter web feature then it is very easy for you to create a Vaadin application. Because the Vaadin community also provided to easiest way to setup project.
check this: https://vaadin.com/start/v14
Then choose the Vaadin version in which you would like to develop this application. Also, fill the other mandatory information and click on the download button. This will create a complete project file in a package. Then you need to import it into the eclipse.
If you are not comfortable with it. then you can download the Vaadin plugin for eclipse and start creating an application just like a creating new project by choosing the Vaadin project from the list given in the project creation wizard.
And also, you can visit my GitHub repository for the source code.
If you face any dependency related issue after successfully importing the project into the eclipse then just try the following command and update the maven project.
mvn clean install
3. Creating the REST client
We already know that we are now going to deal with the service application. So, it is very important to create communication between them. And the first step towards it is creating proxies for the interfaces provided by service application.
Oh…!!! wait a minute
What do you mean by Proxies for the interface?
If you have gone through the service application tutorial then you will remember that we used ARC client for testing our Restful services. we used some URL’s to call from ARC client extension and displaying data on the screen. But now, the case is different we don’t need ARC client or any other 3rd party tool. We need to call it by the programmatic way and for that, we need to have proxies of our interfaces which will help us to build the URL and allow us to directly connect with the required method.
To Support this task. Jersey has provided us the proxy client library. Which can be added in pom.xml as a dependency:
<dependency>
   <groupId>org.glassfish.jersey.ext</groupId>
   <artifactId>jersey-proxy-client</artifactId>
</dependency>
And then we need to create the configuration file which will be responsible for creating the proxy bean. Let’s check the following code:
@Configuration
@ComponentScan(basePackages = "codeworld.tutorial.*")
public class ClientConfiguration {

    private <C> C createClient(Class<C> service, String url) {
        ClientConfig cc = new ClientConfig().register(ObjectMapper.class);
        Client resource = ClientBuilder.newClient(cc);
        return WebResourceFactory.newResource(service, resource.target(url));
    }

    @Bean
    public FilmService filmService() {
        return createClient(FilmService.class, "http://localhost:8077/");
    }

}
You need to register Object Mapper class. Which is a feature to get the support of reading and writing JSON Object to/from POJOS. So, the above code is enough to call our service and get the data.
4. Consume REST Service
In the last point, we have created the client connection. But we missed one thing there.
Oh… Really? And What was that?
You can see we have created client with some configuration for the FilmService. But technically that service belongs to the Service application and we are using this configuration in UI application. Then how it can be accessible in UI Application. To handle this situation service application provided service-api dependency to the UI application.
<dependency>
  <groupId>codeworld.tutorial</groupId>
  <artifactId>service-api</artifactId>
  <version>0.0.1-SNAPSHOT</version>
</dependency>
Like this you can add the dependency of API in pom.xml of UI Application.
DO NOT add the dependency of service implementation.
With the above change, you can access all the interfaces provided in the service api. And need to create a similar client creation for every new service which you wanted to use in UI.
To use the Film service and fetch the data you just need to inject the FilmService interface in spring managed class.
@Autowired
private FilmService filmService;
To fetch the data need to call the method provided in the interface and use some UI component to display it on the screen.
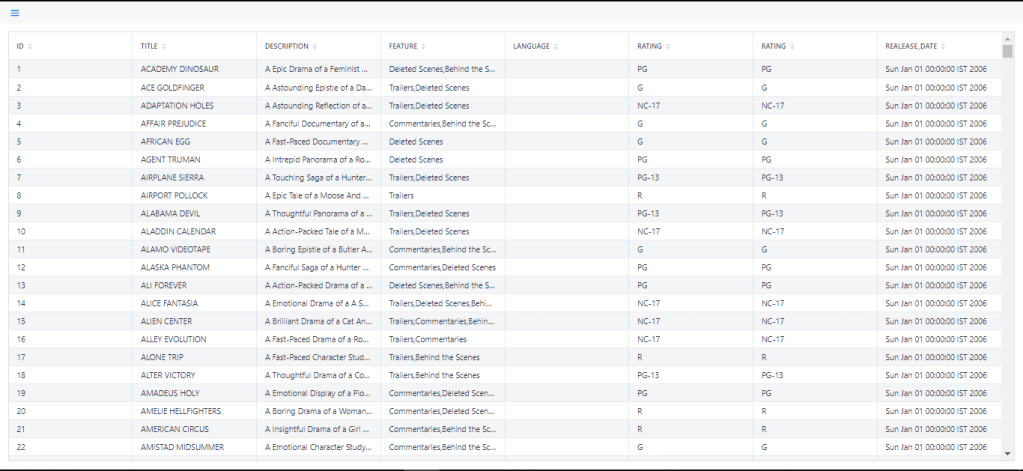
5. Display data on UI component
We have already created a simple Vaadin grid to show our data on UI. You can check that Vaadin grid code on my GitHub link. To display the data, you need to call the respective method of injected resource and pass it to the UI component. For more detail please check out my GitHub project.
How to Run the Applications:
- SERVICE application
Add Server.port =8077 in the application.properties
2. UI Application
We are going to run the UI Application on PORT 8080. But if you run an application without specifying port then by default application will consider 8080 port. So, we don’t need to do anything for UI.
Remember me:
1. you need to specify the exact port number of service while creating the client in the UI Configuration file. If it didn’t match then your UI will never communicate with the service application.
2. For the first time, the UI application may take more time to run. because it downloads all the node modules required for our Vaadin application. and don’t worry it will work smoothly after that.
After running the application you’ll see following output on the screen.
Hurray …!!! We are done with this tutorial.
Conclusion:
We have covered topic which will be helpful for creating a Vaadin based UI application. And also, we understood the easiest way of creating client for calling our REST services.
Thanks,
I hope this tutorial covered all the points which I wanted to explain. For any other queries please contact me.
Keep trying and experimenting…!!!
The source code can be found here: vaadin-jersey-tutorial

Leave a comment